Since July 2022, full beta versions no longer work.
Windows: Install the trial version and, without opening any documents, you can create as many blank windows as needed. After opening the first file, you will no longer be able to open new documents, so create blank windows immediately after launch using Ctrl+Shift+N, then close the License Info window. The window cannot be reused, so it’s better to create multiple blank windows right away.
Linux: Creating new windows with Ctrl+o and opening documents in them works normally
. There’s no need to pre-create multiple blank windows.
Introduction
Typora — the best editor:
- for working with Markdown source files
- for exporting to PDF (see settings below)
Features you can use:
- can be used as a draft, inserting images (saved offline!), syntax-highlighted code, and tables
- requires minimal formatting effort
- convenient for inserting content and cross-references within the document
- allows working with the document as a web page — editing an embedded image changes it in the document
- can reference the same image across different documents
- format is universal and backward-compatible between Typora, Gitlab, GitHub, YouTrack, and Proxmox Notes descriptions
- almost fully supports Markdown syntax in Gitlab, GitHub (readme.md opens automatically)
- maximally compatible for use in online documentation platforms, such as Docsify
Installation
Download manually from the website https://typora.io or install via Choco:
choco install typora --ignore-checksums --execution-timeout=300 --limit-output --no-progress --yesVue.js Theme
This theme pairs perfectly with Docsify. The appearance of documents, their view in Docsify, and exported PDFs will all look identical!
~/.config/Typora/themes/Place these files in this folder:
vue (folder)
vue.css
vue_dark.css
Full archive with themes here:
typora_themes.zip (3.1 MB)Margin Settings
Margins affect content layout. Once set, do not change them to avoid breaking page breaks.
For documentation, you can adopt: top 10, bottom 5, left 10, right 5. With this layout, not all printers will be able to print page numbers.
Inserting Page Breaks (PDF)
To force-insert a page break, use the following code before a heading.
This allows you to generate a PDF suitable for printing with logical text division per page (tables are automatically split).
<div style="page-break-after: always;"></div>
Periodically export the document with previous settings and overwrite to obtain a PDF with the desired page breaks:

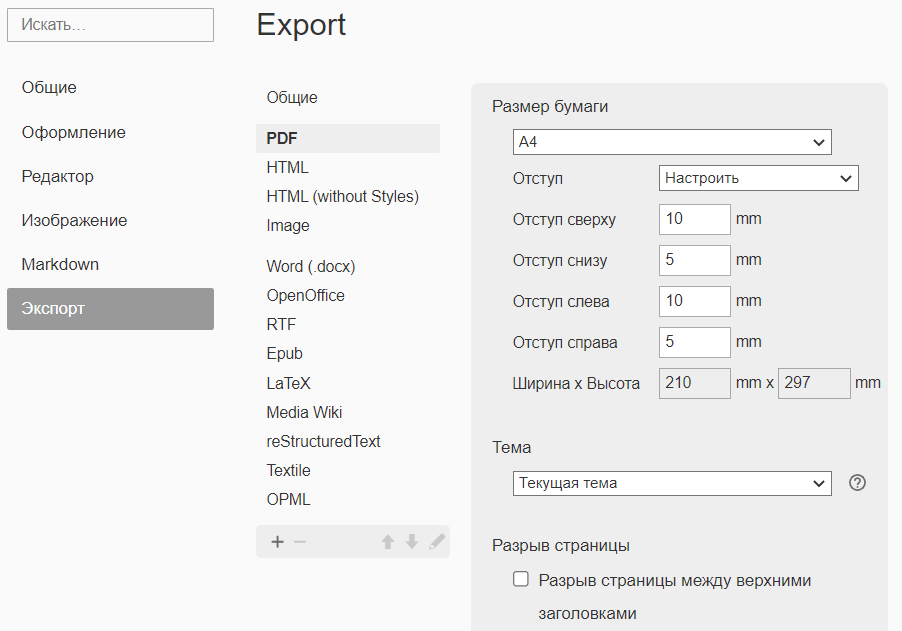

If necessary, adjust page breaks using the separator mentioned above.
Image Insertion Settings
Ensure the option is enabled:
Copy image to user folder = ./images/${filename}
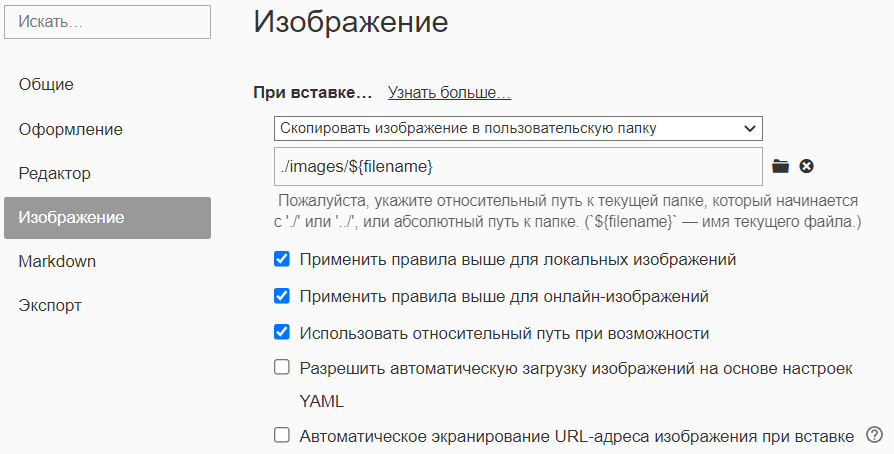
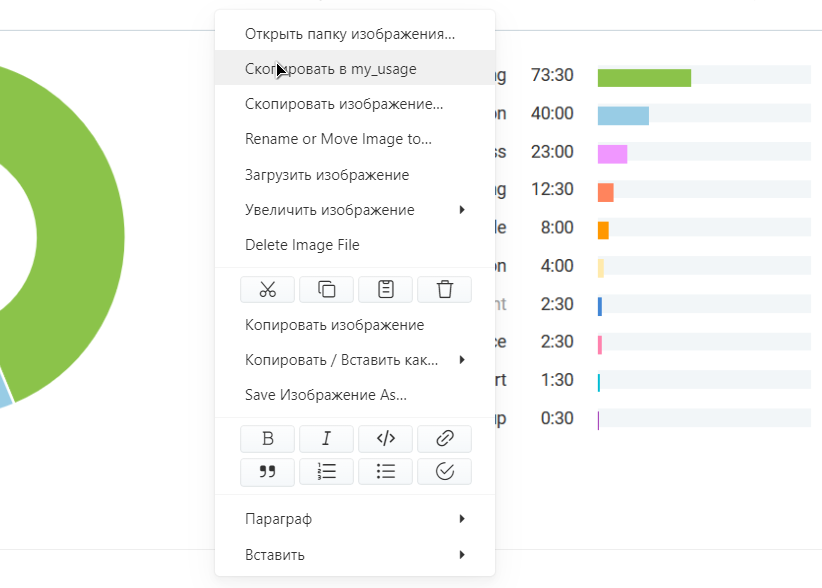
This will allow copying images to the associated local folder. To move an image from the temporary folder to a permanent one, use the context menu on the image: Copy to <folder>..., where “folder” is the folder name matching the document name (automatically created upon the first save of the document).
Be careful with spaces and special characters!
Typora displays images with such paths correctly, but for example, GitLab does not. In such cases, you must adjust the path by replacing special characters using Urlencoder:
     -    %20
!    -    %21
@    -    %40
#    -    %23
$    -    %24
%    -    %25
^    -    %5E
&    -    %26
*    -    %2A
(    -    %28
)    -    %29
<    -    %3C
>    -    %3E
Advanced Formatting Support
Enable advanced formatting support:
Line Numbers in Code Blocks
In recent versions of the program, a checkbox has appeared in the settings that adds line numbering to all code blocks.
If line numbering is needed only in some cases, use this syntax when specifying code highlighting:
{.language-name .numberLines}
or
# to number from a specific line
{.language-name .numberLines startFrom="start-value"}
Remove Break Between Headings
In newer versions of Typora 0.11.7, a setting called “ Page Break Between Top-Level Headings” has been added. Simply disable it permanently.
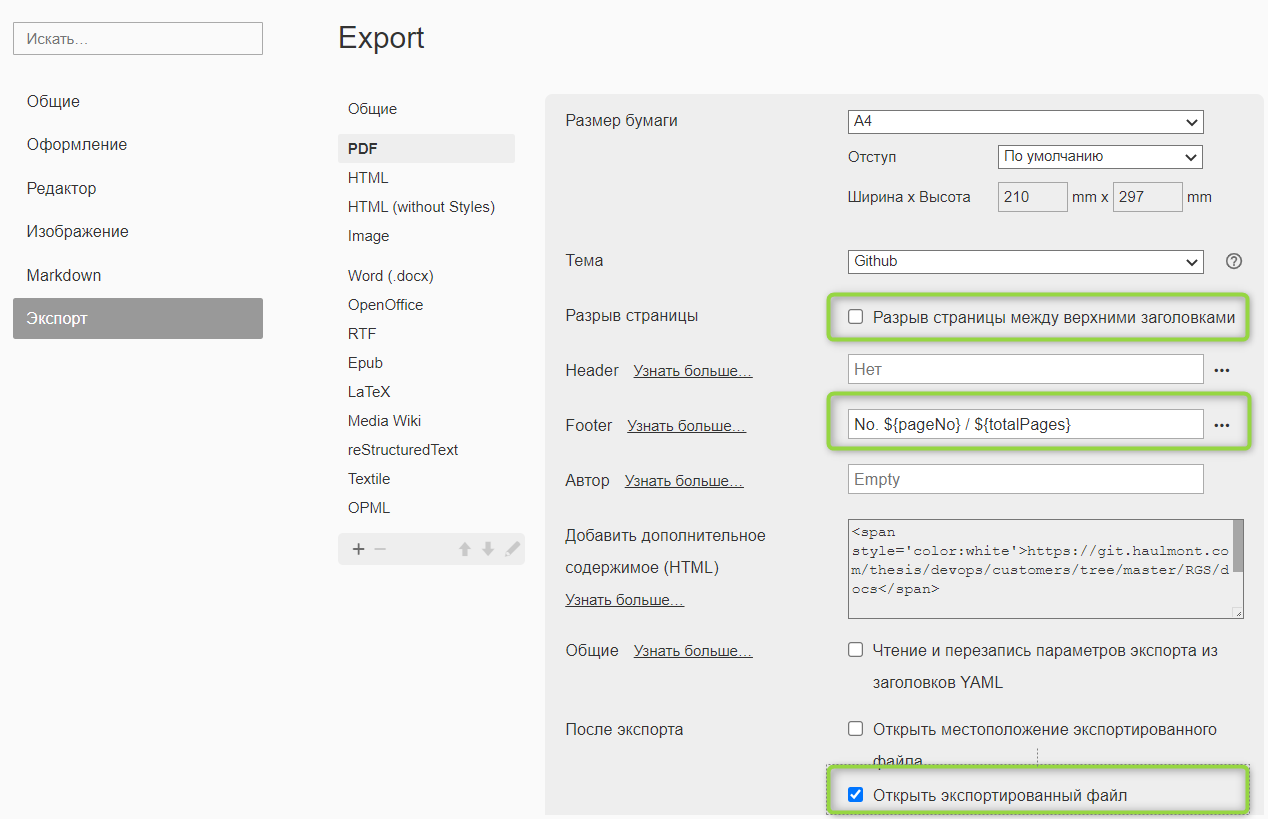
It is recommended to add page numbering (footer):
${pageNo} / ${totalPages}
For older versions before 0.11.7
In older versions:
By default, Typora adds a page break between headings when exporting to PDF, which ruins the PDF pages. To remove this:
Menu → File → Settings → Appearance → Open Theme Directory
Navigate to:
C:\Users\xx\AppData\Roaming\Typora\themes
Open the github.css file and comment out the @media_print block by adding CSS comment symbols /* and */:
/*@media print {
    html {
        font-size: 13px;
    }
    table,
    pre {
        page-break-inside: avoid;
    }
    pre {
        word-wrap: break-word;
    }
}*/
Restart Typora.
Table Page Breaks
In exported PDFs, tables always start on a new page. Change this behavior by opening the theme file C:\Users\...\AppData\Roaming\Typora\themes\github.css and replacing avoid with auto:
Menu → File → Settings → Appearance → Open Theme Directory
    pre {
        page-break-inside: auto;
}

### Documentation

Partially translated documentation: https://way23.ru/typora-%D1%80%D0%B0%D0%B7%D1%80%D1%8B%D0%B2%D1%8B-%D1%81%D1%82%D1%80%D0%B0%D0%BD%D0%B8%D1%86/

### Emoji Insertion

https://github.com/ikatyang/emoji-cheat-sheet

### Markdown Cheat Sheet

[Markdown-Reference.pdf|attachment](upload://bJJtcLkXrjMiDU9xA38FqzPSZJd.pdf) (334.3 KB)

### Diagrams

https://support.typora.io/Draw-Diagrams-With-Markdown

https://mermaid.js.org/syntax/gantt.html

[typora_diagrams.md|attachment](upload://t9Q87PYdpkvGHOIrRP5wvRWvtWe.md) (12.8 KB)

```mermaid
stateDiagram-v2
    State1: The state with a note
    note right of State1
        Important information! You can write
        notes.
    end note
    State1 --> State2
    note left of State2 : This is the note to the left.
%%{init: {
  "theme": "base",
  "themeVariables": {
    "pie1": "#8BC34A", "pie2": "#f3d69c", "pie3": "#FF5722",
    "pie4": "#009688", "pie5": "#5C6BC0", "pie6": "#03A9F4",
    "pie7": "#EF4444", "pie8": "#ec070c", "pie9": "#FFC107",
    "pie10": "#ca936d","pie11": "#c9edfa","pie12": "#E91E63"
  }
} }%%
pie title
    "CI/CD, SETUP, RND (HA/LB)" : 37.3
    "Other (DB, BACKUP, etc.)" : 15.94
    "CONSULT + Support" : 13.3
    "PM, process" : 10.45
    "PERIODIC / SETUP (VM)" : 7.4
    "DOCS" : 5.31
    "PRESALE" : 4.6
    "MONITORING" : 3.85
    "ONBOARD / PREPARE" : 1.82
    "MANUAL / FIX" : 0.18
    "RND (Architecture)" : 0.05
Button
To get the button:

Add this code at the beginning of your README.md document:
<style>
.markdown-section .mybutton, .markdown-section .mybutton:hover {
  cursor: pointer;
  color: #CC0000;
  height: auto;
  display: inline-block;
  border: 2px solid #CC0000;
  border-radius: 4rem;
  margin: 2px 0px 2px 0px;
  padding: 8px 18px 8px 18px;
  line-height: 1.2rem;
  background-color: white;
  font-family: -apple-system, "Segoe UI", "Helvetica Neue", sans-serif;
  font-weight: bold;
  text-decoration: none;
}
</style>
To insert the button, use the code with the class specified:
[Requires clarification](URL ':class=mybutton')
The button will appear as a regular link in PDF.